Battery switch on travel trailer function is crucial for managing your RV’s power. Understanding how your battery switch works is key to preventing electrical issues and maximizing your off-grid adventures. This guide dives into the different types of switches, their locations, operation, troubleshooting, and safety precautions. We’ll cover everything from single-pole switches to more complex double-pole double-throw setups, helping you understand the nuances of power management in your travel trailer.
We’ll explore how to correctly operate your switch, identify potential problems like corrosion or loose connections, and even walk you through upgrading or replacing your switch if necessary. Proper battery switch usage is essential for a smooth and safe camping experience, so let’s get started!
Types of Battery Switches in Travel Trailers
Choosing the right battery switch for your travel trailer is crucial for managing your power sources efficiently and safely. Different types of switches offer varying levels of control and protection. Understanding their features and limitations will help you make an informed decision.
Single-Pole Battery Switches
Single-pole switches are the simplest type, offering a single on/off function for a single battery bank. They’re relatively inexpensive and easy to install. However, they only allow you to connect or disconnect one battery at a time. This means you can’t easily switch between your house battery and your starting battery, for example, without physically disconnecting one and connecting the other.
This can be inconvenient and potentially unsafe.
Double-Pole Battery Switches
Double-pole switches provide more control by allowing you to isolate both positive and negative terminals simultaneously. This improves safety by preventing accidental shorts during switching. They’re commonly used for switching between two battery banks (e.g., house and starting batteries) independently, offering better power management. The disadvantage is that they are slightly more complex to install and are generally more expensive than single-pole switches.
Double-Pole Double-Throw (DPDT) Battery Switches
DPDT switches offer the most control and flexibility. They allow you to switch between multiple battery banks (often two or three) or connect both banks simultaneously. This is useful for charging multiple batteries from a single source or using both batteries to power high-draw appliances. The increased complexity and number of connections, however, increase installation time and cost.
They also tend to be bulkier than simpler switches.
So, you’re an audiophile who travels? Awesome! Check out this guide on audiophile travel setups for tips on keeping your sound quality high on the go. It covers everything from portable DACs to noise-canceling headphones. Then, for more in-depth advice on selecting the right gear, head over to this other resource on audiophile travel setups – it’s got some great reviews and comparisons to help you make informed decisions.
Happy listening, wherever you roam!
Comparison of Battery Switch Types
| Switch Type | Number of Batteries Controlled | Simultaneous Isolation | Complexity | Cost |
|---|---|---|---|---|
| Single-Pole | 1 | No | Low | Low |
| Double-Pole | 1 or 2 (independently) | Yes | Medium | Medium |
| Double-Pole Double-Throw (DPDT) | 2 or 3 (selectable) | Yes | High | High |
Operation and Functionality of the Battery Switch
Understanding your travel trailer’s battery switch is crucial for managing power and preventing accidental drain. This switch controls the flow of electricity from your batteries and/or shore power to your trailer’s appliances and systems. Proper operation ensures a smooth and safe camping experience.This section details the step-by-step operation of a typical double-pole double-throw (DPDT) battery switch, commonly found in RVs.
We’ll cover the function of each position and illustrate the power flow with a descriptive example.
So, you’re an audiophile who travels? Awesome! Check out this guide on building the perfect audiophile travel setup for pristine sound on the go. It covers everything from portable DACs to noise-cancelling headphones. Want something more budget-friendly? Then consider looking at another great resource for building a audiophile travel setup that won’t break the bank.
Remember, good sound doesn’t have to be expensive; it just needs a little planning!
Double-Pole Double-Throw (DPDT) Switch Operation, Battery switch on travel trailer function
A typical DPDT battery switch offers several positions to control power flow from your batteries and shore power. These positions are usually clearly labeled on the switch itself, but understanding their function is vital for efficient power management. Incorrect usage can lead to battery drain or damage to your electrical system.The positions generally include: “Off,” “Battery,” “Shore Power,” and “Both.” Let’s break down each one.
- Off: In this position, all power to the trailer’s electrical system is disconnected. This is the safest position when your trailer is not in use or when performing maintenance on the electrical system.
- Battery: Selecting “Battery” connects only your trailer’s batteries to the electrical system. This allows you to run your appliances and lights using the power stored in your batteries. This is ideal for off-grid camping.
- Shore Power: Choosing “Shore Power” connects your trailer’s electrical system directly to the power source at a campsite (typically 120V AC). This will charge your batteries (if the converter is correctly wired) and power your appliances.
- Both: This position connects both your batteries and shore power to the trailer’s electrical system. This allows you to run appliances from shore power while simultaneously charging your batteries. It’s important to note that if you’re running high-draw appliances while in the “Both” position, the batteries might not charge effectively, or even discharge slightly.
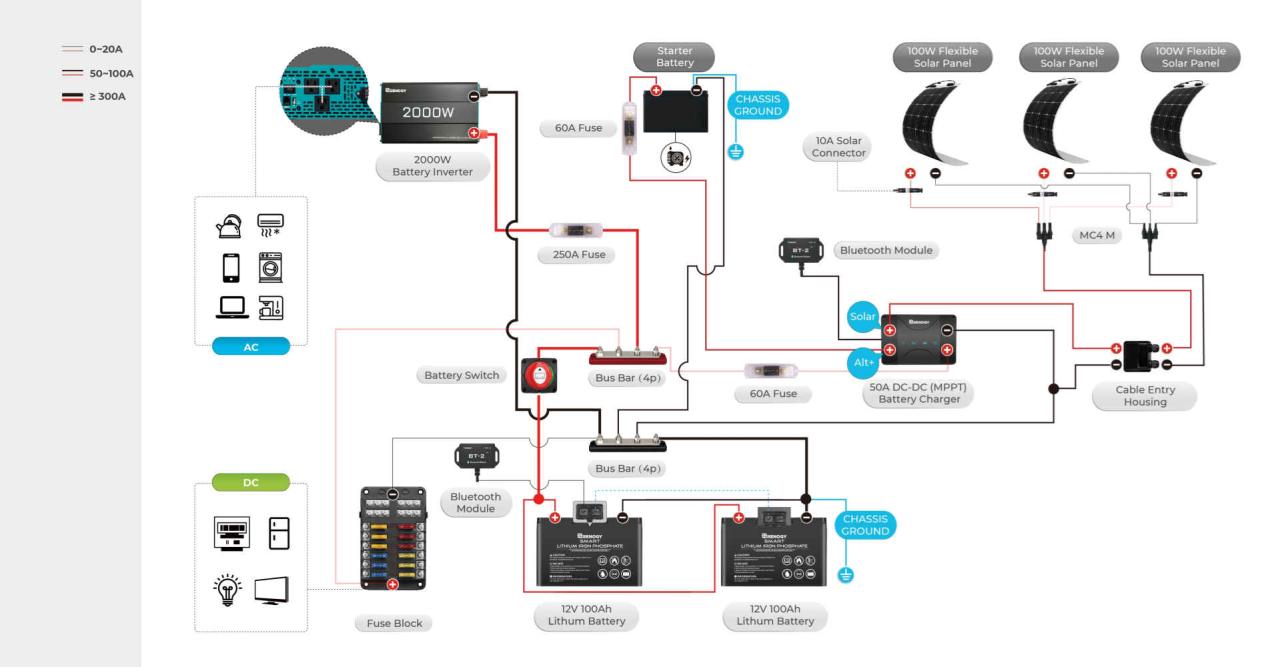
Power Flow Illustration
Imagine a simple diagram. Think of the battery switch as a three-way intersection. One road leads to your trailer’s electrical system (lights, fridge, etc.). Two other roads lead to your batteries and your shore power hookup.
- Off: All roads are blocked. No power flows to the trailer.
- Battery: Only the road from the batteries is open; power flows from the batteries to the trailer.
- Shore Power: Only the road from shore power is open; power flows from the shore power to the trailer.
- Both: Both roads from the batteries and shore power are open; power flows from both sources to the trailer.
This simplified representation helps visualize the power flow through the switch in each position. Remember, the actual wiring is more complex, but this analogy clarifies the basic functionality. Always consult your trailer’s wiring diagram for specific details.
Troubleshooting Common Battery Switch Issues: Battery Switch On Travel Trailer Function
Your travel trailer’s battery switch is a critical component, ensuring you can easily manage power from your house batteries and your tow vehicle. Problems with this switch can leave you stranded without power, so understanding common issues and how to troubleshoot them is essential. This section will guide you through identifying and resolving some of the most frequent problems.
Battery switch malfunctions often stem from simple issues that can be easily fixed with a little DIY know-how. However, ignoring these problems can lead to more significant damage, potentially impacting your batteries and other electrical systems. Early detection and proactive maintenance are key to preventing larger issues.
Corrosion
Corrosion is a common culprit in battery switch malfunctions. The damp environment and potential for chemical reactions around the battery and switch create an ideal breeding ground for corrosion. This build-up of oxides and sulfates can impede the flow of electricity, leading to poor or intermittent power. Visual inspection will often reveal a white, green, or bluish powdery substance on the terminals and switch components.
Cleaning the terminals with a wire brush and a solution of baking soda and water, followed by a protective coating of dielectric grease, is usually sufficient to resolve this issue. Severe corrosion may require replacing affected parts.
Loose Connections
Loose connections are another frequent cause of battery switch problems. Vibrations during travel can loosen terminal clamps or wires, disrupting the electrical circuit. This can manifest as intermittent power or a complete loss of power to certain systems. Tightening loose connections is a simple fix. However, if the terminals are significantly worn or damaged, replacement may be necessary.
It’s crucial to ensure a secure connection at each point, using appropriate tools and avoiding over-tightening which could damage the terminals.
Switch Failure
The battery switch itself can fail due to wear and tear, corrosion, or simply age. Symptoms of switch failure can range from complete non-functionality to erratic behavior. The switch may not make or break the connection properly, leading to inconsistent power supply. In such cases, the most effective solution is usually to replace the entire switch. When selecting a replacement, choose a switch with a similar amperage rating to the original to ensure compatibility with your system.
Always disconnect the battery before working on the switch or any other electrical components.
Battery Switch Inspection and Maintenance Checklist
Regular inspection and maintenance can prevent many battery switch problems. Following this checklist will help ensure the longevity and reliable operation of your switch.
- Visual Inspection: Check for corrosion, loose connections, or any signs of damage on the switch and terminals.
- Terminal Tightness: Ensure all terminals are securely tightened. Use a wrench to tighten, avoiding over-tightening.
- Switch Operation: Test the switch in all positions, verifying proper connection and disconnection.
- Cleaning: Clean terminals and switch contacts with a wire brush and baking soda solution if corrosion is present.
- Dielectric Grease Application: Apply dielectric grease to the terminals after cleaning to prevent future corrosion.
- Frequency: Perform a thorough inspection at least twice a year, or more frequently if you use your travel trailer extensively in harsh conditions.
Safety Precautions When Working with Battery Switches
Working with the electrical systems in your travel trailer, especially the battery switch, requires careful attention to safety. Improper handling can lead to serious injury from electric shock, burns, or even fire. Understanding and following these precautions is crucial for protecting yourself and your RV.
Both 12V and 120V systems present distinct hazards. 12V systems, while lower voltage, still carry enough current to cause a painful shock, especially if you have a damp skin. 120V systems, on the other hand, pose a much greater risk of severe shock or electrocution. Always treat both systems with respect and take appropriate precautions.
Potential Hazards of Incorrect Battery Switch Operation
Incorrect operation of the battery switch can lead to several problems. For instance, accidentally connecting the house batteries to the chassis battery while the engine is running can overload the charging system, potentially damaging the alternator or batteries. Conversely, failing to disconnect the house batteries before performing maintenance on appliances can result in electric shock. Furthermore, leaving the battery switch in the “on” position while the trailer is stored for extended periods can lead to battery drain and potential damage.
Necessary Safety Equipment When Working with Battery Switches
Before working on your travel trailer’s electrical system, gather the necessary safety equipment. This minimizes the risk of injury.
This list isn’t exhaustive, but it covers the essentials. Remember, safety is paramount.
- Insulated Gloves: Thick, rubber insulated gloves are essential to protect your hands from electric shock.
- Safety Glasses: Protect your eyes from sparks or potential battery acid splashes.
- Non-Conductive Tools: Use tools with insulated handles to avoid accidental contact with live wires.
- Voltage Tester: A multimeter or voltage tester is crucial to confirm power is disconnected before working on any component. Always double-check.
- Battery Terminal Cleaner: Clean terminals before connecting or disconnecting to ensure a good connection and prevent corrosion.
- Ventilation: Work in a well-ventilated area, especially when working near batteries, to avoid exposure to potentially harmful gases.
Upgrading or Replacing a Battery Switch
Upgrading or replacing your travel trailer’s battery switch can significantly improve your RV’s electrical system, offering better control, increased safety, and potentially longer battery life. Choosing the right switch depends on your needs and the complexity of your setup. This section will guide you through the process of selecting and installing a new switch.Replacing a battery switch isn’t overly complex, but it does involve working with electricity, so safety is paramount.
Always disconnect the battery’s negative terminal before starting any work. This prevents accidental shocks and short circuits.
Types of Battery Switches for Upgrades
Several types of battery switches offer improvements over older models. A simple upgrade might involve moving from a basic rocker switch to a more sophisticated switch with better features. For example, replacing a standard single-battery switch with a dual-battery switch allows you to independently control two batteries, increasing your camping flexibility and runtime. Alternatively, consider an automatic switching system, which automatically selects the best battery source.
These systems typically include features like low-voltage disconnect to protect your batteries. Finally, digital battery monitors offer a level of control and monitoring that surpasses traditional switches, allowing you to precisely track battery voltage, amperage, and state of charge.
Replacing a Battery Switch: A Step-by-Step Guide
This guide assumes you’re replacing a standard battery switch with a similar type. If you’re upgrading to a more complex system (like an automatic switching system or digital monitor), the process will be more involved and may require professional assistance. Always consult your RV’s wiring diagram and the instructions provided with your new switch.
- Disconnect the Battery: Begin by disconnecting the negative (-) terminal of your battery. This is crucial for safety.
- Remove the Old Switch: Locate the old battery switch. This is usually near the battery or in a convenient access panel. Unscrew the switch from its mounting location and disconnect the wires. Take photos or make notes of the wiring connections before disconnecting them to aid in reassembly.
- Prepare the New Switch: Carefully examine the new battery switch and its wiring diagram. Ensure it matches your existing setup. If the new switch has different terminals or connections, you may need to adjust the wiring accordingly.
- Connect the Wiring: Connect the wires to the new switch, matching them precisely to the connections of the old switch based on your notes or photos. Ensure that all connections are secure and that there are no loose wires.
- Mount the New Switch: Mount the new switch securely in the same location as the old switch. Use the appropriate screws and ensure it’s firmly attached.
- Reconnect the Battery: Carefully reconnect the negative (-) terminal to the battery.
- Test the Switch: Turn on the switch and test all circuits to ensure everything is working correctly. Check that your lights, appliances, and other electrical components function as expected.
Tools Required for Battery Switch Installation
Before starting the installation, gather the necessary tools. Having these ready will make the process smoother and safer.
- Screwdrivers (Phillips and flathead, appropriate sizes)
- Wire strippers/cutters
- Crimping tool (if using crimp connectors)
- Wire connectors (if needed)
- Multimeter (to test circuits)
- Wrench (to disconnect the battery terminals)
- Safety glasses
- Work gloves
Mastering your travel trailer’s battery switch is a fundamental skill for any RVer. By understanding its function, location, and potential issues, you’ll be better equipped to handle power management efficiently and safely. Remember to always prioritize safety and consult a professional if you’re unsure about any aspect of your RV’s electrical system. Happy travels!
FAQ Explained
What happens if I leave my battery switch in the “Both” position?
Leaving the switch in the “Both” position continuously connects both your house batteries and shore power. This can lead to overcharging your batteries and potentially damage your electrical system if not managed carefully. It’s generally best to only use this position briefly, for example when charging batteries from shore power.
How often should I inspect my battery switch?
Inspect your battery switch at least once a year, or more frequently if you notice any unusual behavior or if you’re using your RV extensively. Check for corrosion, loose connections, and ensure the switch operates smoothly.
Can I use a battery switch from a different RV in my travel trailer?
While it might seem possible, it’s not always recommended. Different RVs may have different electrical systems and amperage requirements. Using an incompatible switch could lead to safety hazards. Always use a switch that’s rated for your RV’s specific electrical system.
My battery switch is making a clicking noise. What’s wrong?
A clicking noise often indicates a problem with the switch itself or a loose connection. This could be due to corrosion or a faulty switch. Check all connections and consider replacing the switch if the problem persists.
